Hi again, it's Robin from Class of Kinders.
I am excited to share a little of my classroom with you.
It seems like there is never quite enough space in my classroom to fit all that I want for my students. I have literacy center time for my Kinders and Firsties because it provides independent practice on skills that I have taught ...and it gives me a chance to meet with my small groups.
The problem is…centers take up space! …valuable space.
The answer for me was a few portable centers!
So, I created a "listening center" using a shower caddy and an ipod shuffle.
I just add a book and it is a "grab and go" listening center for my students.
Off they go to find a comfy spot to read!

My little set up looks like this. I just hang the caddies on the wall:
Off they go to find a comfy spot to read!

My little set up looks like this. I just hang the caddies on the wall:
I got these green and blue caddies from a seller on etsy.com:
( I love the READING ROCKS message…don't you? )
You can request which ever wording you wish!
You can request which ever wording you wish!
Each caddy contains one book and one shuffle and a pair of ear buds or headphones.
But if I need more than one student to listen to a story, I can simply at a "splitter."
It looks like this:
This little green splitter can be found at Walgreens, Walmart or even Amazon. Now, there are two headphones going into one shuffle which allows two students to
listen to one book at the same time. Perfect!
This set up is also wonderful because I can have more than one book available to my students to listen to. It use to be, one book, 4 headphones, and everyone is listening to the SAME story at the SAME time. That's ok, but this works so much better, not to mention it breathes new life into
the listening center.
I get all of my books on CDs from Scholastic. I usually buy the packs with 4 or 5 books with CDs. These are a GREAT bargain and really good quality literature.
Once I get them from Scholastic, I pop a CD into my computer (I use a Mac), upload it to my iTunes library which saves on my computer. It prompts me each step of the way.
Once it is saved in my iTunes library I click JUST the one book I want. I ONLY put one book on each iPod shuffle…because these little devices can be tricky for little fingers to navigate since there is no window to view the audio selections. One book on the shuffle makes it easy for my students to push play and get busy listening. And this means less interruptions during my small group time, which is exactly what I need!
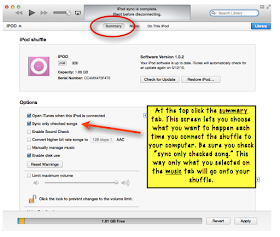
Here is the FIRST tab (summary) once I connect my shuffle to my computer:
Then the SECOND tab (music):
And the THIRD tab (on this ipod):
After my students listen to a story in the listening center
I ask them to complete a response to the story. (I usually add this part after a while,
once they get the hang of just using the shuffle and listening to the book.) The response
sheet usually goes with a skill/concept I am teaching.
Here are a few FREEBIES I have found on TpT for your listening center!
I hope this inspires you to create a portable listening center for your classroom!
…thanks for taking time out of your day to join us in Paradise.
'till next time,


This is a great way to keep a listening center fresh and exciting. I'm sure your kids love this! Thanks for sharing.
ReplyDeleteThanks Trina!
DeleteYou have thought of everything! I love how you use the iPods and thank you for the detailed instructions. This is such a terrific way to do a listening center.
ReplyDeleteIt does make it a bit more fun for the kiddos. :-)
DeleteThis covers everything!!! Well organized and easy to use, what a Bonus!! Thanks for sharing!
ReplyDeleteWelcome Elaine! :-)
DeleteI Love these grab and go listening centers! Thanks for the detailed "how to"!! :0)
ReplyDeleteWelcome Cara!!
DeleteThat's really clever (and they're so cute, too)!
ReplyDeleteThanks Andrea!
DeleteThis is a great way to expand on Buddy reading. Now if I can get my hands on some i pods or shuttles! Thanks for the "How to" directions too.
ReplyDeletePauline @ First Grade by the Sea